
A Guide to H.264 Streaming with Regards to FRC
For two and a half years, I’ve been trying to reliably stream H.264 video from our robot to our driver station. Finally, this year, the stream worked reliably. I’m going to graciously detail how we did this. The post is structured as a tutorial, with some background theory worked in. I’ve tried to provide links wherever possible for further exploration.
So, I shall first start off with:
Table of Contents
- What’s this H.264 thing and why do you want it?
- Technology overview
- GStreamer RTSP Server
- Systemd and services
- OpenCV and GStreamer
- Appendix: Some Code
- A little postmortem
What’s this H.264 thing and why do you want it?
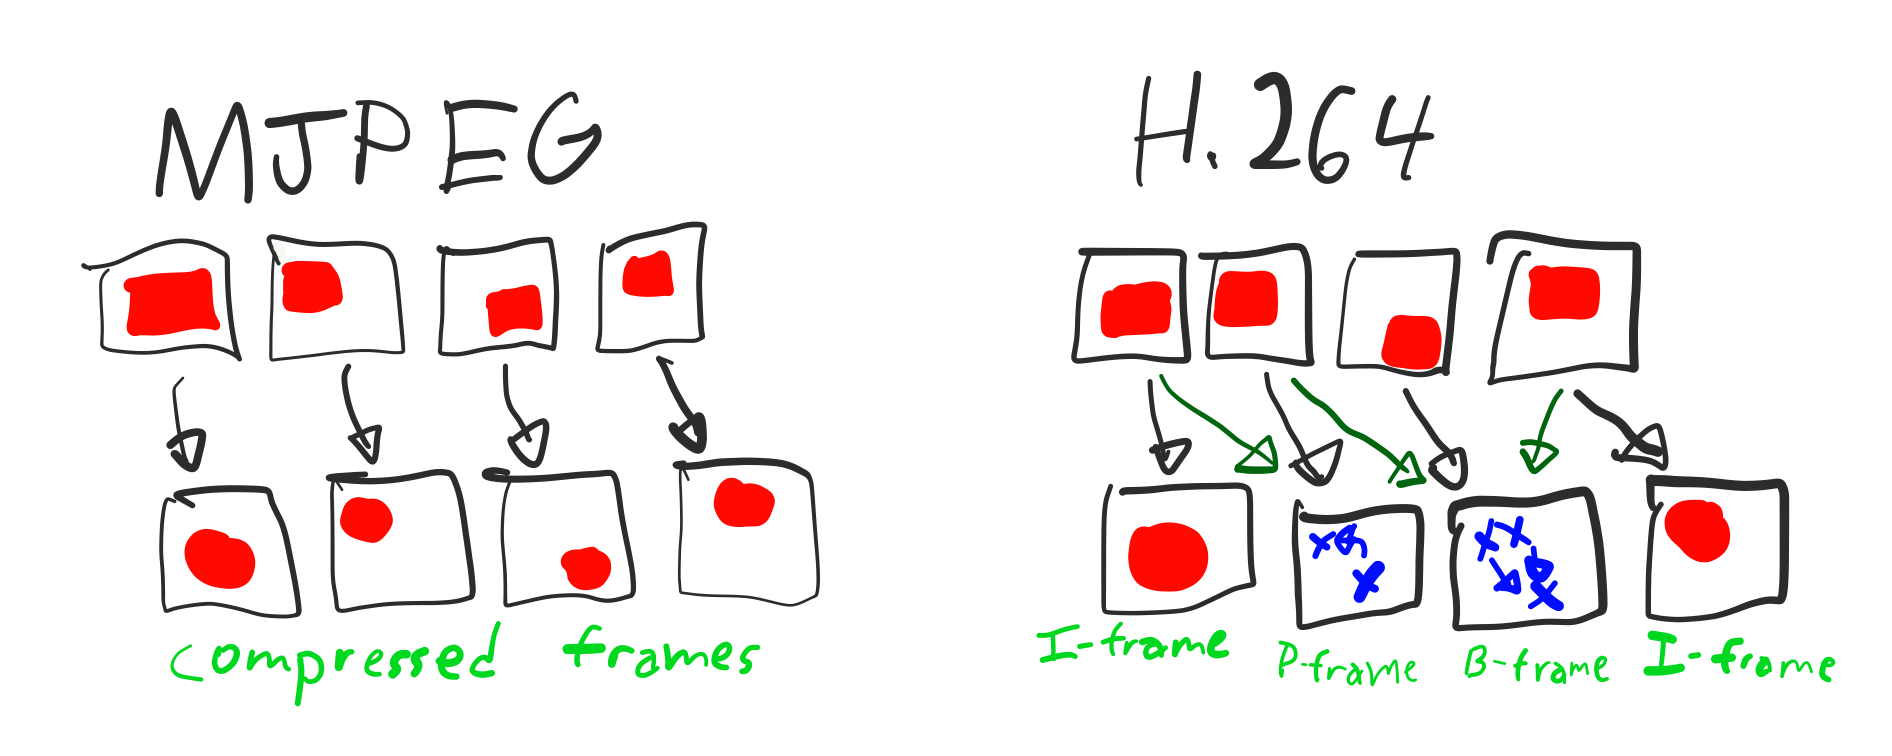
MJPEG and H.264 are both video codecs. They define how to compress video. The de facto standard in FRC right now is MJPEG (transported over HTTP). And for a pretty good reason. It’s easy and fast to compress images to JPEG; you don’t need very powerful hardware. Plenty of libraries exist to compress images to JPEG, and streaming the video to somewhere else simply requires sending the images immediately one after another over HTTP. You can also display the stream in browsers, dashboards, and just about anything that’s not your toaster.
MJPEG compresses each frame individually, making them more fuzzy to save bandwidth. You could also call this spatial compression. In addition to spatial compression, H.264 utilizes temporal compression, or compressing changes between each frame. Imagine your robot is bricked (I said imagine; I know this would never happen to you). In your camera feed you see Team 1072 scoring five points in the hatch scale boiler. How much changed in that image? Not much. An MJPEG steam would send everything visible in the feed again, including the beautiful gray carpet. An H.264 stream would send only the information necessary to locate reconstruct the 1072 bot’s movement. You may imagine this would add up to lots of data savings. It does. You can fit a somewhat good-looking 320x240 video at 15 fps into 250 kilobits per second. You could stream four cameras under 1 Mbps.
If your robot is executing victory spins, you’ll see less data saving as the scenery around will be constantly changing. However, there will still be compressible elements moving across your field of view, and in practice there are still substantial reductions in data.
Since H.264 requires some more power (appropximately 10 more oomphs of cpu) to do its compression, you really want to use some external coprocessor to do your video encoding should you choose to run with this.
I’d rather not go too far in depth explaining how H.264 and other modern video compression codecs work. There are much better guides which already do this like this introductory one and this more in-depth one. These are both absolutely gorgeous and I’d recommend you read them both for educational learning and expanding your spiritual intellect. But to explain the codec, it applies to each frame the same chroma subsampling JPEG uses (dividing the image into a luminosity plus two color channels then heavily compressing the latter) then divides the compressed frame into subsections called blocks. Every so often the codec sends an I-frame or Intra frame. Opposite of the Latin root inter- (between/among), an intra- (inside/within) frame describes a single frame by itself, described only by itself, not performing any motion or temporal compression. If your video consisted of only I-frames, it would be practically the same as an MJPEG stream. P-frames (predicted from the previous frame) and B-frames (bi-predicted from the previous and following frames), describe frames by the motion of the blocks in adjacent frames. Remember how we divided each compressed frame into blocks? P-frames and B-frames encode vectors describing where each of these blocks approximately moved to. If a pink flamingo suddenly appeared in only one frame, however, it would be impossible to find that flamingo in an adjacent frame and say “Hey the flamingo moved from the top left to the center.” Unless your camera is mounted high it shouldn’t be hallucinating. Thus, to encode for spontaneous pink flamingos among other new objects in the frame, the codec also sends the difference between the actual frame and the frame predicted by block motions. Since such difference should be small, it can be heavily compressed (with DCT for example) and sent very efficiently. H.264 applies some extra compression to these frames, and that’s all!
Try this!
Before I get to the content, I’m going to quickly plug Team 3494’s potential-engine. It’s basically a plug and play implementation of what I describe in the GStreamer RTSP Server section. That is, all the hard work is already done for you. You don’t even need to understand what GStreamer is to use it. If you’re looking to stop reading take a break from my writing, check out the project! And then of course keep reading.
I lied about not needing to understand GStreamer. While potential-engine handles all your RTSP server needs, GStreamer running on the driver station with the
rtspsrcelement plays streams with significantly less lag than FFmpeg, so it’s helpful to learn and use GStreamer there until we get a dashboard that supports H.264. So as I said, just keep reading.
Technology overview
FFmpeg and GStreamer are possibly the two largest media frameworks. They’re both open source too! Both can do streaming, but I find GStreamer more extensible.
Often I find FFmpeg nicer for video conversion. If you ever save video off the robot, FFmpeg is great for transcoding it to other formats. However, I’ve found that in cases of video streaming, I often get too much lag and type Fs into the FFmpeg process. GStreamer, in my view, gives more transparency in how it’s handling your stream, which in turn allows for more easily tuning it to reduce lag.
GStreamer basics
This is adapted from GStreamer’s much better tutorial, which makes for good reading.
Our end goal here is to take video from a camera and send it (or, if you’re confident in your ability, fully send it) to another computer. The process that grabs the video, decodes it, re-encodes it, wraps it up, and ships it is called a pipeline. A pipeline is like a blanket statement; it accounts for and encapsulates everything going on.
We have to build our pipeline somehow. Not out of wood like most FRC robots, but out of elements. An element is like that well-written function every programmer desires to write one day: it performs one specific task. That could be reading from a camera, changing color spaces, encoding to H.264, or sending the stream across the network. All these are elements.
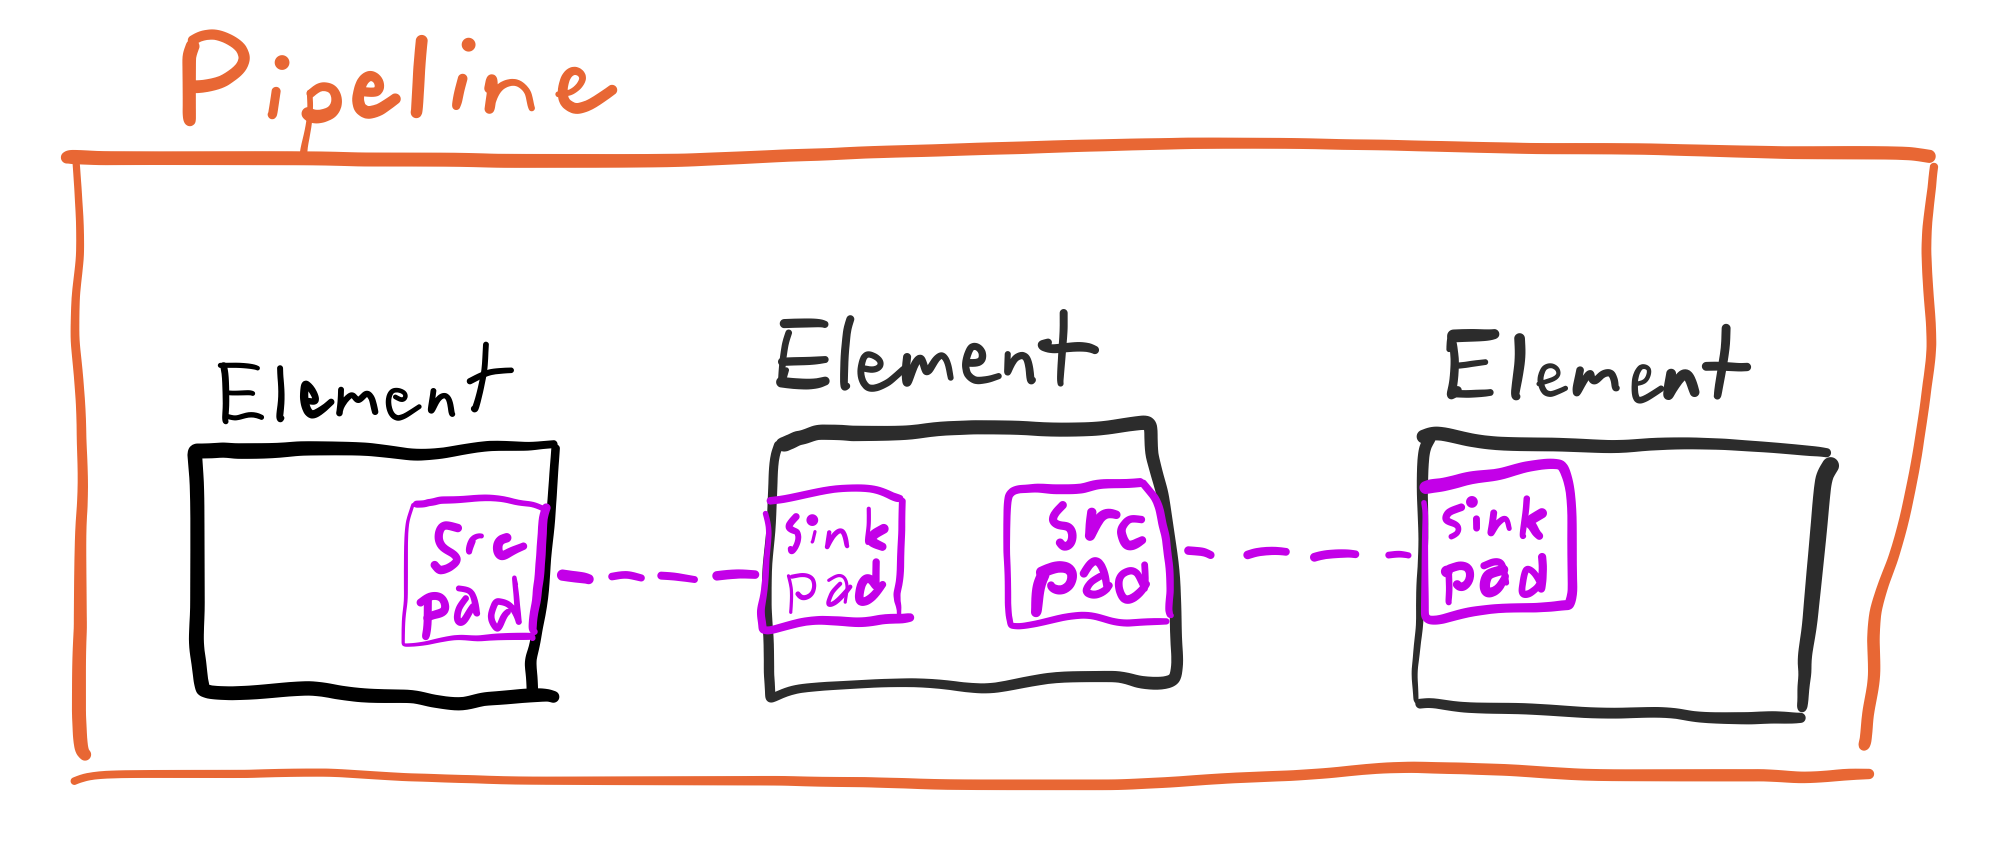
Elements need to be linked together. To accomplish this, each element has one or more pads. Data flows into an element’s sink pad and out of its source pad. These names may seem reversed. Why are we sending data into the sink and out of the source? Elements that provide media (such as a file reader, filesrc) end with src. These have a single source pad. Elements to which data is sent off (tcpserversink) end with sink and have a single sink pad.
Pads also have data types. The tutorial above gives a great analogy:
A pad is similar to a plug or jack on a physical device. Consider, for example, a home theater system consisting of an audio amplifier, a DVD player, and a (silent) video projector. Linking the DVD player to the amplifier is allowed because both devices have audio jacks, and linking the projector to the DVD player is allowed because both devices have compatible video jacks. Links between the projector and the amplifier may not be made because the projector and amplifier have different types of jacks. Pads in GStreamer serve the same purpose as the jacks in the home theater system.
Here we’re working with software, not your grandpa’s video equipment. In GStreamer, data types are specified as a MIME type (for example video/x-h264) with a number of options (like width, height, and framerate).
Some elements support multiple data types to be inputted or outputted. GStreamer determines which data types should be used by a process called caps negotiation. Caps is short for capabilities. Each element imposes its own restrictions on caps, so the process can be seen as solving a large system of equations for the correct caps to use. Whew! This system of equations may sometimes have multiple solutions, and GStreamer might pick the right one. To recover from this doomsday fiasco, GStreamer includes a special element capsfilter, which allows you to enforce the type of data which flows through it. It’s kind of like casting, only without parentheses.
Some example GStreamer pipelines
This is adapted from this other GStreamer tutorial. It’s also good reading.
Install GStreamer using this guide. Use the 64-bit version if your computer supports it. Make sure to grab the development installer as you’ll need it to use GStreamer with OpenCV. If you don’t plan on doing this the runtime installer works too. Once GStreamer is installed and on your path, you’ll be able to run the command gst-launch-1.0. This is how you launch a GStreamer pipeline. If your terminal replies that the gst-launch-1.0 command was not found, double check the GStreamer bin folder has been added to your path.
A very basic example
Here’s about the most basic of a pipeline you can get:
gst-launch-1.0 videotestsrc ! videoconvert ! autovideosink
videotestsrc outputs SMPTE color bars to its source pad. autovideosink takes input from its sink pad and displays it on your screen. The data types of these two pads includes information on their color space. There may be a chance their caps (capabilities) to not account for the same color space. In this case, videoconvert converts between the two color spaces. It decides which color spaces to convert between as a result of caps negotiation.
More complex examples
This one takes video from a Logitech C920 camera (which outputs H.264-encoded video natively) and streams it over UDP to port 5002:
gst-launch-1.0 v4l2src device=/dev/video0 name=pipe_src \
  ! video/x-h264,width=1280,height=720,framerate=15/1,profile=baseline \
  ! h264parse ! rtph264pay pt=96 config-interval=5 \
  ! udpsink name=udpsink0 host=127.0.0.1 port=5002 async=false
While this worked in testing, this specific pipeline was unreliable in competition last year. It may have been because it was UDP. Perhaps it was because I wrote my own wrapper around this pipeline to determine the IP address of the driver station (which we didn’t make static), and the wrapper had bugs.
The video/x-h264 in the pipeline above is short for a capsfilter. As the camera could output a variety of framerates and frame sizes, we must enforce the size and framerate we want.
The one below takes input from a normal webcam, converts it to h264, (we used some special fisheye cameras but anyone which works with your laptop and doesn’t require fancy drivers should work) and hands it over to an app:
gst-launch-1.0 v4l2src device=/dev/video0 \
  ! video/x-raw,width=320,height=240,framerate=15/1 \
  ! videoconvert ! video/x-raw,format=I420 \
  ! x264enc tune=zerolatency bitrate=250 threads=1 \
  ! rtph264pay config-interval=1 name=pay0 pt=96 ! appsink

The rtph264pay element puts the stream into the RTP container format. H.264 video is basically just a stream of bits. RTP defines how these bits get assembled into packets which can then be sent one at a time over the network.
As for the H.264 encoder, x264enc, the bitrate of 250 is 250 Kbps, and we use one thread because we had four cameras streaming video. If you have a machine with four cores and are using four separate processes for sending video, why bother multithreading even more? The tune=zerolatency here is a preset that adjusts the parameters of the encoder to try to minimize the amount of time it takes to compress the video. We’re aiming for speed rather than quality here.
GStreamer RTSP Server
I made the lucky choice of using RTSP this year, for it offers numerous advantages that using a simple udpsink or something doesn’t:
- It’s a server. That means you don’t need a static ip address for whatever is connecting to it
- It’s a server. That means you can connect to it multiple times and don’t need to worry about something else hogging the stream.
- It’s a server. That means YOU DON’T HAVE TO WRITE YOUR OWN
- It’s a server. That means you can negotiate settings with it (read: not having to hardcode them into the server), such as whether you’re using TCP or UDP
- The client rtspsrc has a ton of options. Like what port ranges to receive on, etc.
- You can have as many streams as you like controlled on a single port. So you won’t chew up the limited number allotted by FIRST.
You may notice I said it’s a server. I think that’s really cool.
Installation
This thing doesn’t come with GStreamer. This means you’ll have to download and build it yourself. Here is a method that worked for me:
- Determine the gstreamer version by running
gst-launch-1.0 --version. For me that’s1.12.3, so I’ll use that in future instructions. - Download the tarball of the correct release of the RTSP server. For me this is at http://gstreamer.freedesktop.org/src/gst-rtsp-server/gst-rtsp-server-1.12.3.tar.xz. Note the version number in here. You can use
wgetfor downloading. - Unzip that tarball by executing
tar -xf gst-rtsp-server-1.12.3.tar.xz - At this point you may delete the tarball
- Navigate to the source directory (
cd gst-rtsp-server-1.12.3) - Run
./configure - Compile! Run
make -j4(the-j4splits this into 4 processes to run on 4 cores; use a different number if you have a more powerful computer)
There should now be lots of little binaries in the examples folder!
My own server pipeline
To get started, you can use the test-launch binary to play with various pipelines. It takes in the port you want to run the rtsp server on (for exampe 5800 to be compatible with FRC rules) as an argument as well as the GStreamer pipeline you’d like to use. For example:
./test-launch -p 5800 "( videotestsrc ! x264enc ! rtph264pay name=pay0 pt=96 )"
There are several ways to view this stream. One is to use VLC. Open a network stream at the url rtsp://localhost:5800/test and you should see some video. While this method works and you may already have VLC installed, it adds significant lag for some reason. I would 96/100 would not recommended for anything except testing that the stream opens correctly.
The other option is to use GStreamer, which works much better. Use the following command to view your stream:
gst-launch-1.0 rtspsrc location=rtsp://localhost:5800/test latency=0 \
  ! rtph264depay ! decodebin ! autovideosink
Unlike VLC, the stream should launch almost instantly.
If you’d like to be more advanced, you can use one of the pipelines several sections above to take input from your camera, which may or may not be more helpful for FRC than pixels colored in some predetermined pattern. This is one example which takes input from any camera you may have nearby and runs encoding on your computer:
./test-launch -p 5800 "( v4l2src device=/dev/video0 ! video/x-raw,width=320,height=240,framerate=15/1 ! videoconvert ! video/x-raw,format=I420 ! x264enc tune=zerolatency bitrate=250 threads=1 ! rtph264pay config-interval=1 name=pay0 pt=96 )"
When viewing the stream, you should see a nice-looking grey rectangle. After a few seconds, the H.264 encoder will send you an I frame and the video thereafter should be representative of what your camera sees.
Some fries on the side
For some, one camera feed is not enough. You might want a camera on the side of your robot, perhaps underneath, or maybe facing up so you don’t have to strain your neck to look at the ceiling when you’re bored. While this task may seem daunting, don’t worry! There’s more to the GStreamer RTSP server project than just this one command line example. It’s an example after all. To add multiple feeds I’ll work off the test-launch.c example. Here are the changes you’ll need to make:
1. Hardcode the pipeline
If you’re feeling like a good programmer, you could pass all the pipelines through the command line and support any number of them. I do not identify myself as such a mythical programmer, so I will instead embed the pipelines in the source code.
Replace the line gst_rtsp_media_factory_set_launch (factory, argv[1]); with something like:
gst_rtsp_media_factory_set_launch (factory, "( v4l2src device=/dev/video0 ! video/x-raw,width=320,height=240,framerate=15/1 ! videoconvert ! video/x-raw,format=I420 ! x264enc tune=zerolatency bitrate=250 threads=1 ! rtph264pay config-interval=1 name=pay0 pt=96 )");
2. Add the second pipeline!
Before the line you just changed, there’s a line which creates a factory object. This line creates an object used to stream our pipeline. The two lines of code below also help accomplish this mission. To add a second pipeline, you’ll need to copy these four lines and modify them a little. Change the pipeline string to something different this time and change the url the pipeline is served on.
In total, you should be adding four lines similar to the following directly before the line g_object_unref (mounts);:
factory = gst_rtsp_media_factory_new ();
gst_rtsp_media_factory_set_launch (factory, "( videotestsrc ! x264enc ! rtph264pay name=pay0 pt=96 )");
gst_rtsp_media_factory_set_shared (factory, TRUE);
gst_rtsp_mount_points_add_factory (mounts, "/fries", factory);
Repeat this step as many times as you’d like for more streams!
3. Compile!
Save test-launch.c, open a terminal in the same directory, and run make. If the code compiles without errors or glaring red text, running ./test-launch -p 5800 should start an RTSP server with two streams accessible by rtsp://localhost:5800/test and rtsp://localhost:5800/fries.
Extra fanciness
There’s much more to the RTSP server. Examples of these other “much more”s are in the example folder. Perhaps you are concerned about job security and would like to password protect your stream so you are the only person on the team capable of opening it. The file test-auth.c has an example of how to implement authentication.
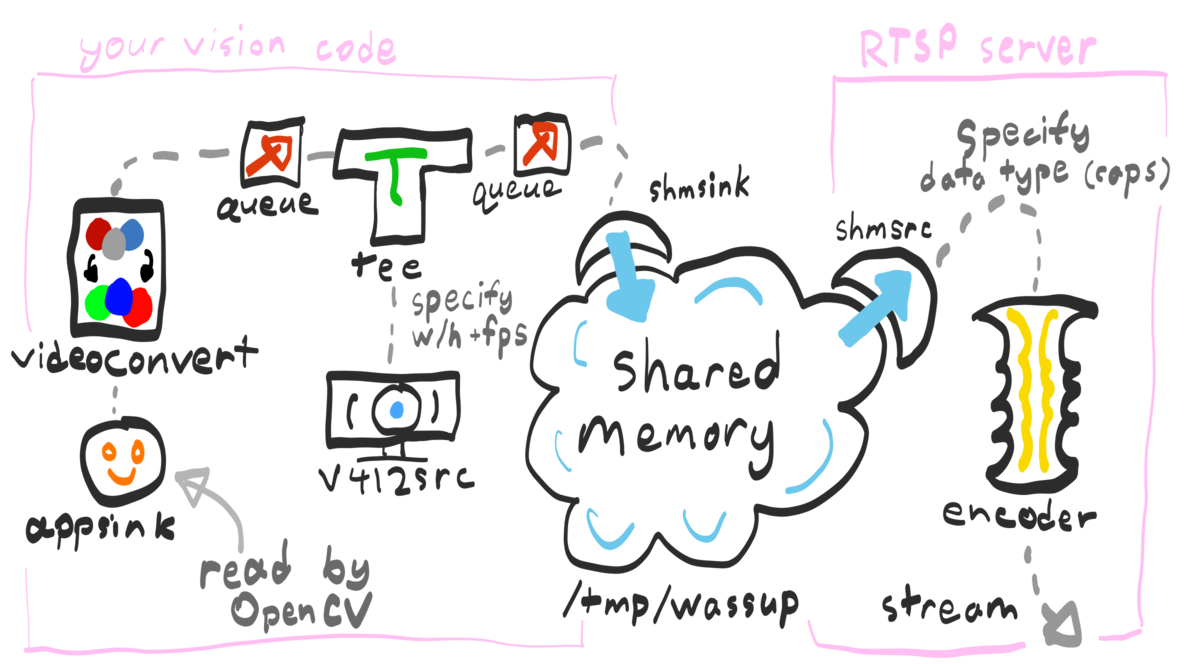
You said you wanted to do vision processing too?
I have said nothing of OpenCV up to this point except name-dropping it in the table of contents. If you’d like to use it (or your generated GRIP code) to do target detection with the video feed you are streaming, you have three possible options:
- Fetch the stream from the RTSP server then decode it
- Write the stream from the RTSP server to shared memory then access the memory via OpenCV
- Open the camera from OpenCV while writing to shared memory then read the memory within the RTSP server
Option 1 is simply inefficient. By encoding then decoding on the same computer, you’re only using extra CPU cycles, consuming more energy, which depending on where you obtain your energy from is either raising CO2 levels, milling more wind, damming more water, or stealing more light from the sun. Option 2 may work, but likely won’t. The pipelines created within the RTSP server are only run when a client is connected. If no clients are connected, the pipeline is not run. This means your vision won’t work unless you are connected to the RTSP server. Maybe this is how you control your AI algorithms, but option 3 is likely better. Assuming your OpenCV code doesn’t frequently segfault or throw NullPointerExceptions, it will constant write new frames to shared memory, and the RTSP server will only read these when a client is connected.
In order to do this magic you’re going to need OpenCV to be built with GStreamer support on whatever device you’re using. Perhaps your package repositories come with said support. Check your build options to see if such support exists. If not, install packages named something like libgstreamer1.0-dev and libgstreamer-plugins-base1.0-dev and compile OpenCV (with Python support if you want it) following instructions from one of the many great guides on the interwebs.
Afterwards, believe my explanation on why option 3 is better and then implement it.
To write to shared memory via OpenCV, use the shmsink element. Rather than doing something like VideoCapture(2), use:
VideoCapture('v4l2src device=/dev/video2 ! '
             'video/x-raw,width=320,height=240,framerate=15/1 ! '
             'tee name=t ! queue ! videoconvert ! appsink drop=true '
             't. ! queue ! shmsink socket-path=/tmp/wassup')
Then in your RTSP server use:
gst_rtsp_media_factory_set_launch (factory, "( shmsrc socket-path=/tmp/wassup ! <INSERT CAPS HERE> ! videoconvert ! video/x-raw,format=I420 ! x264enc tune=zerolatency bitrate=250 threads=1 ! rtph264pay config-interval=1 name=pay0 pt=96 )");
Because GStreamer is only writing the frame contents to memory, it won’t know what the format of these frames actually are when it reads them. For all it knows they could be base-64 encoded then phoenetically translated to the Russian alphabet and translated back to Pig Latin. Thus, you’ll need to determine the data type (caps) GStreamer writes to the shmsink and specify this data type when you read the frames. Run the first pipeline using gst-launch-1.0 -v v4l2src ..., and you’ll see the caps printed in the console. Replace <INSERT CAPS HERE> with the line that corresponds to the shmsink element, transcribed to fit the format you’ve been seeing here (which only entails removing the (int) and (string) strings).
You can probably tell I haven’t implemented any of the shared memory stuff recently. Take these instructions with a grain of salt and if they don’t work or are too vague, please consider creating an issue on my blog repository.
Drawing contours and debugging info
If you’re running vision processing on the images you’re streaming, you may also be interested in adding overlays to your stream, such as the contours and bounding boxes your algorithm detects. Rather than three methods as before, there are only two ways you can accomplish this:
- Open your stream on the driver station using OpenCV (I cover the installation steps required for this later in the post). You can then use OpenCV’s drawing functions and then use
imshowto display your frames. - Use a language that has GStreamer bindings. I could never get the Python ones to work on Windows (as of a year and a half ago), but Java and C both work. Use these library bindings to create a pipeline with an
rsvgoverlay, then edit the element’sdataproperty to reflect an SVG representation of your contours.
Option 1 is much easier, but may be slightly more laggy than option 2. If you’d like to embark on option 2, you could attempt to understand some undocumented Java code I once wrote to edit an rsvgoverlay (check out the createStream method and the block on line 78). This is really the sort of thing I would write another blog post on, but writing about Java isn’t my cup of tea.
Some more on viewing
As mentioned before, the rtspsrc element comes with a plethora of features. Running gst-inspect-1.0 rtspsrc will list you them. You can use protocols=tcp to force the server to send the stream over TCP (which we have not had to do but may be needed if UDP proves unreliable for you) or port-range=5800-5810 to force the stream to be sent back via a limited subset of ports.
Historically the FMS has seemed to filter only the ports servers are hosted on, which means clients can connect on any port they like. So while the RTSP server has to be on a legal port like 5800, we’ve been able to connect on any random port number. Thus, we haven’t needed to use the
port-rangeoption. But it’s there if you ever need it.
Systemd and services
If you’re running GStreamer on Linux, chances are your system comes with a tool for starting services on boot and logging them called systemd. While it is controversial due primarily to its feature creep among other issues, it’s neverless utilized by many of the processes your computer runs on boot and in the background. To automatically run our RTSP server on boot, I’ll create a systemd service.
Here is the service file I’ll use:
# /etc/systemd/system/streaming.service

[Unit]
Description=Team 1072 Camera Streaming

[Service]
ExecStart=/home/team1072/startstreaming.sh
KillMode=process
Restart=on-failure
RestartPreventExitStatus=255
Type=simple
WorkingDirectory=/home/team1072/video

[Install]
WantedBy=multi-user.target
You’ll notice here I refer to this startstreaming.sh script. The contents of it are below:
#!/bin/sh
set -e # Exit if any of the commands below error

# Reload the uvcvideo driver with a specific quirks option
# quirks=128 enables a fix for fixing bandwidth issues with the type of cameras we use.
# Basically, it allows us to use multiple cameras on the same usb port.
rmmod uvcvideo
modprobe uvcvideo quirks=128

# Run the test-launch script with gstreamer debugging turned on
GST_DEBUG=2 /home/team1072/gst-rtsp-server-1.12.3/examples/test-launch -p 5800
Now instruct systemd to load the service files again:
sudo systemctl daemon-reload
To start our service and enable it on boot, run:
sudo systemctl start streaming
sudo systemctl enable streaming
If you run sudo systemctl status streaming, you should see that the service is running and some log output from the server.
If you’d like to view the complete logs of the service, you can run:
journalctl -u streaming
Bonus: Saving limelight video
Systemd is useful for just about any service you want to run. Since we use a Limelight on our robot, we find it useful to save its video for future debugging purposes. Below is a script to do just that:
#!/bin/bash
# download-limelight.sh

# Form a filename based on the current date and time
file=videos/$(date "+%Y-%m-%d;%H-%M-%S-limelight.mjpeg")
# Download the stream to that file
gst-launch-1.0 souphttpsrc location=http://10.10.72.11:5802 ! filesink location=$file append=true
This is the service file which runs that script:
# /etc/systemd/system/download-limelight.service

[Unit]
Description=Limelight video downloader

[Service]
Type=simple
ExecStart=/home/team1072/download-limelight.sh
Restart=always
RestartSec=30

[Install]
WantedBy=multi-user.target
The RestartSec parameter instructs systemd to wait 30 seconds before restarting the script in case it fails. This way, if the Limelight isn’t on, the script won’t hog any CPU power.
OpenCV and GStreamer
In the examples above GStreamer was used to view the RTSP stream. This is enough for any casual use, and you can write a batch script (or whatever shell scripting language your system supports) to launch multiple streams. However, there’s a limit: GStreamer supports a limited number of options for modifying your stream (such as adding overlays or applying perspective transforms). That’s not to say its support is basic: GStreamer can rotate your stream, draw SVGs on top, scale it, and add filters so you can post it on your social media. However, opening the stream via OpenCV drops you into a magical world.
Unfortunately, OpenCV doesn’t just come with GStreamer support. The package on pip doesn’t support it. The anaconda packages don’t support it by default. Perhaps Homebrew supports it with the right options, but the FRC driver station only runs on Windows so Mac software is out of the question. To gain GStreamer support, you’ll need to build OpenCV yourself. The process takes some time, so be prepared to set aside a few hours, but after building OpenCV you’ll be one FBI visit away from feeling like a hacker. Let’s get started!
1. Download GStreamer
If you didn’t download the development version of GStreamer, install it using this guide.
2. Download OpenCV
Grab a release from the OpenCV GitHub releases page. Download the archive labeled Source code as a zip or tar. Unzip/tar it to some location you’ll remember.
3. Download the build tools
To build OpenCV you can choose between using Visual Studio and MinGW as your compiler. I’ll use Visual Studio since it’s well supported by Microsoft which made your operating system. Download the community edition from here (or by searching for Visual Studio in your preferred search engine). OpenCV also uses CMake as a build tool. Binary distributions are available on the CMake download site.
4. Install everything else
If you’d like to use OpenCV from Python, make sure Python and NumPy (via pip install numpy) are installed. There are several other optimization libraries you may wish to install listed on OpenCV’s tutorial.
5. Create a build folder
Open the OpenCV folder you downloaded from GitHub. It should have files named README.md and CMakeLists.txt in it. Create a new folder inside and name it build.
6. Run CMake
Open the CMake graphical interface. Next to “Where is the source code:”, select the OpenCV folder. As for “Where to build the binaries:”, select the build folder you created.
Then click “Add Entry”. Add a path option with name GSTREAMER_DIR and path C:/gstreamer/1.0/x86_64 (assuming you installed 64-bit GStreamer to C:/gstreamer).
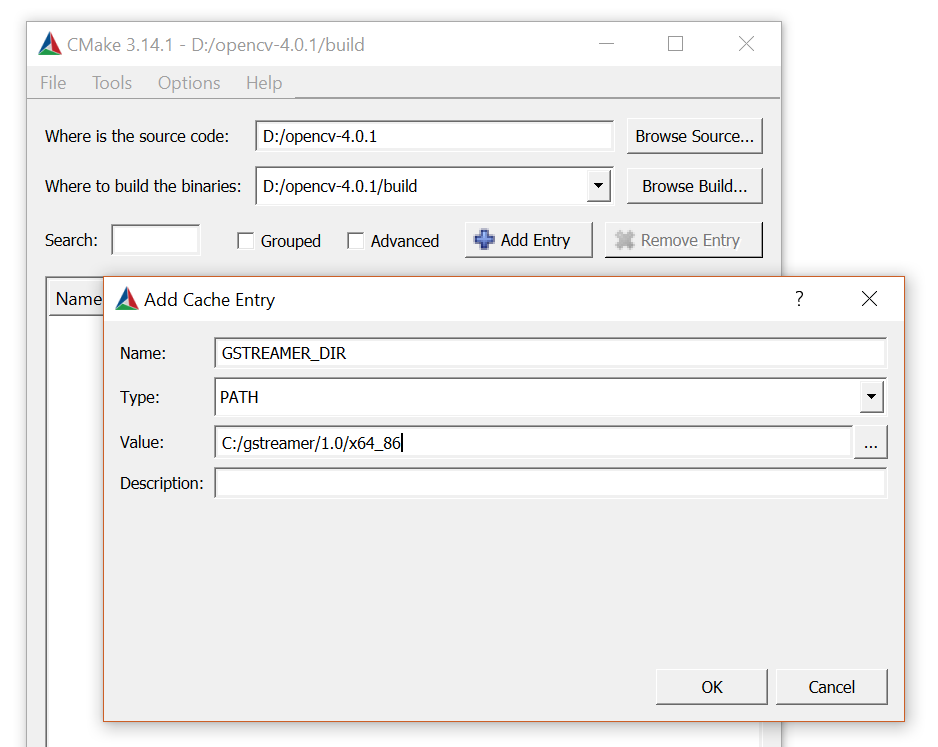
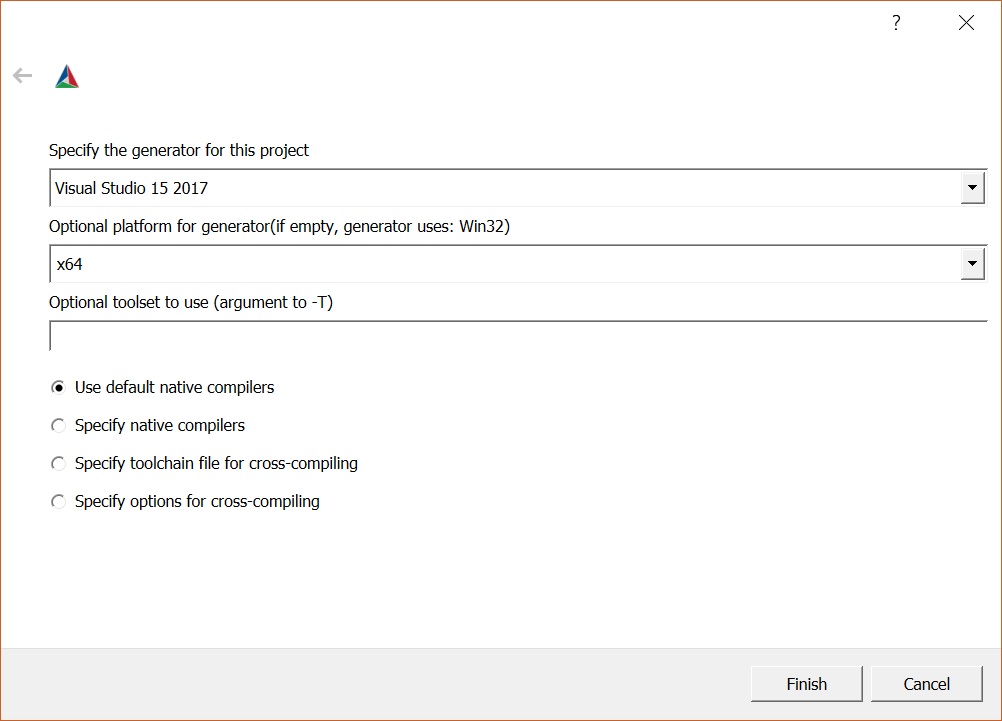
Click the Configure button. You’ll be asked to select a compiler. Select the version of Visual Studio you installed. You’ll also be asked to select an architecture (Optional platfor for generator). Chances are you installed the 64 bit version of GStreamer, so use x64. If Visual Studio complains about errors linking libraries, chances are you selected the wrong architecture.
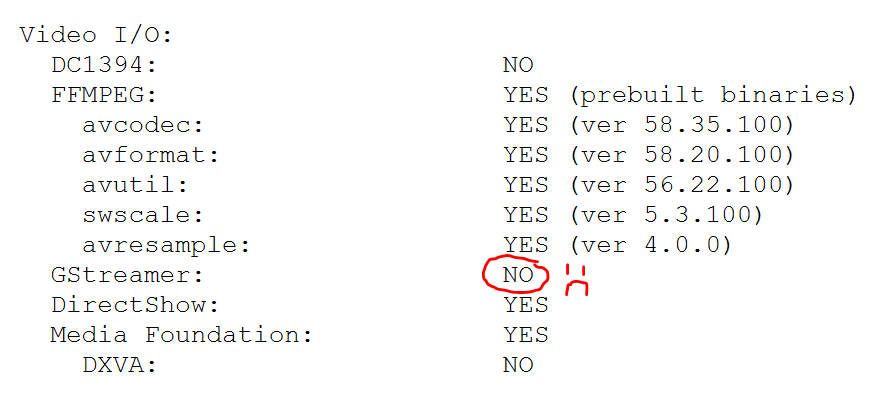
If the output in the log shows that OpenCV found GStreamer, click “Generate” then “Open Project”.
7. Build with Visual Studio
After clicking “Open Project”, Visual Studio will open itself.
Before building, make sure to switch to Release mode. Unless you installed debug binaries with Python and would like to compile in Debug mode.

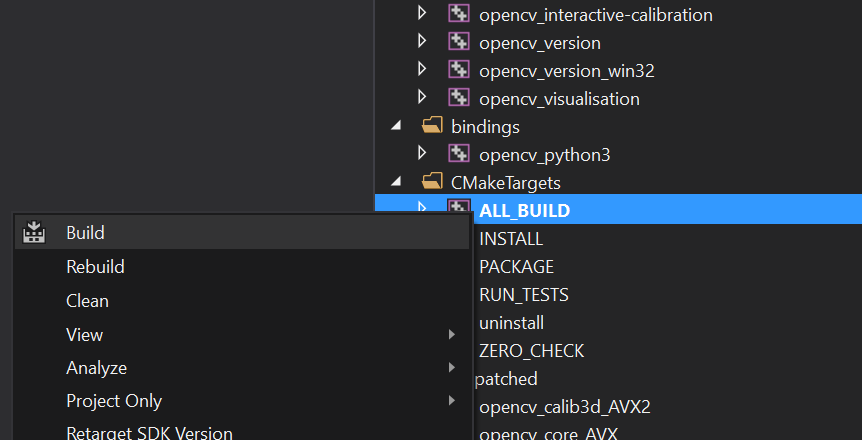
Now to build! Under the solution panel, right click the BUILD_ALL task then click “Build”. This process (of building not the clicking) takes about an hour depending on how powerful your computer is. Once it finishes successfully, build the INSTALL task. Depending on how you installed Python, you may need to quit Visual Studio and relaunch it as Administrator to resolve permissions errors.
8. Prosper
After running Python, you should be able to import cv2. You can open the RTSP stream using a GStreamer pipeline via the OpenCV VideoCapture object, such as in the following code:
import cv2

# Open the stream via GStreamer. Note that the pipeline ends with an appsink
# element, which OpenCV reads from. The sync and drop options here instruct
# Gstreamer to not block the program waiting for new frames and to drop
# frames if OpenCV cannot read them quickly enough.
def makecap():
    return cv2.VideoCapture(
        'rtspsrc location=rtsp://localhost:5800/test latency=0 ! rtph264depay ! decodebin ! appsink sync=false drop=true',
        cv2.CAP_GSTREAMER
    )

cap = makecap()
while True:
    successful, frame = cap.read()
    if successful: # Display the frame
        cv2.imshow('Frame', frame)
        if cv2.waitKey(10) == ord('q'):
            break # Exit the program if the key q is pressed
    else: # If a frame can't be read try restarting the stream
        cap = makecap()
You could write this code in C too, but I don’t C why you would want to. Just kidding; it’s a great language, but I’m just keeping this blog post concise by keeping code in one language.
The code handles auto-restarting the RTSP client, so you can leave the script running in the background and let it automatically reconnect when your RTSP server comes online. Even if you don’t have any processing to do to the frame, OpenCV is worth its return in automatic restarting your stream if your network fails.
If you’re not running any processing, you may prefer to continue using GStreamer’s viewing window. In that case, you can split the video (that’s what tee does) into one stream that’s displayed and another which is passed to OpenCV. This as an example pipeline to accomplish this:
'rtspsrc location=rtsp://10.10.72.12:5800/test latency=0 transport=tcp ! rtph264depay ! decodebin ! tee name=t ! queue ! videoconvert ! appsink sync=false drop=true t. ! queue ! videoconvert ! autovideosink'
Appendix: Some Code
Throughout this tutorial I’ve been pasting snippets of code. If you’d like to see our code in practice, it’s at this gist.
A little postmortem
If you closely inspected my code, you may have noticed that I name the videos I save by the current time. Most mini computers running Linux don’t happen to have a real time clock on them. Firstly, this means that if your computer isn’t connected to some internet source, it will report the incorrect time. That may or may not be okay with you. However, the computer we used (A Kangaroo PC) did something more egregious: at boot the time was always the same. That’s right; our system loved March 6 at 4:24 AM, even if we ran our code several weeks later. That meant video was stored to the same exact files. Luckily we used the append=true option, so the video concatenated itself into one terrible chunk.
I haven’t taken the time to implement such a scheme, but using strings of random characters as filenames would have been a much better option. If you’re blindly copying code from the gist above you may want to consider this. I’ll be making such changes the morning we compete at Houston.